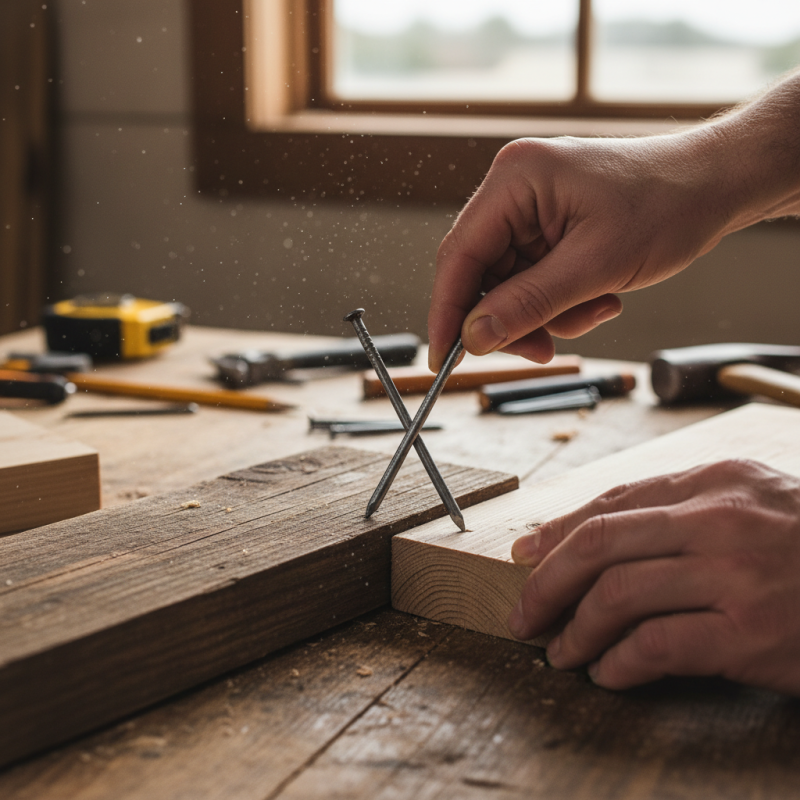
Nail Interlock Techniques and Best Practices for DIY Projects?
Nail interlock techniques provide a sturdy and reliable method for various DIY projects. These methods leverage the strength of interlocked nails. This approach is ideal for woodworking and home repairs. When done correctly, it enhances the overall durability of your work.
However, mastering nail interlock is not always straightforward. Many beginners struggle with the correct angles and spacing. A slight miscalculation can lead to weak joints, compromising your project. It's essential to practice these techniques to gain confidence. Sometimes, even seasoned DIYers may need to reflect on their approach and adjust their methods.
With the right guidance, nail interlock can transform your projects. Detailed understanding and attention to detail are crucial. It's not just about hammering nails together; it’s about creating a robust structure. Even small mistakes can have significant consequences. Embrace the learning process, and don't hesitate to improve your skills along the way.
Understanding Nail Interlock Techniques for DIY Projects
When tackling DIY projects, understanding nail interlock techniques is crucial. These methods create strong joints, ensuring durability. According to a report by the Construction Industry Institute, proper fastening can increase structural integrity by up to 30%. This highlights the importance of nail interlocking.
Nail interlock techniques involve aligning nails at angles. This method enhances grip and stability. However, achieving the perfect angle can be challenging for many DIYers. A slight misalignment can weaken the structure. In a survey, 40% of DIY enthusiasts reported issues with joint stability due to improper nailing techniques. It's essential to practice and refine your skills.
Learning from mistakes is part of the process. Many novices underestimate the power of nail placement. Overlooking details can lead to costly repairs later. Emphasizing precision in joints is key. Research indicates that only 50% of DIY projects are completed without rework. Focusing on nail interlock techniques can significantly improve outcomes in your projects.
Nail Interlock Techniques and Best Practices for DIY Projects
| Technique | Description | Best Use Cases | Tools Needed |
| Basic Interlock | Using two nails to create a strong connection between joints. | General framing and structure. | Hammer, nails, measuring tape. |
| Diagonal Interlock | Nails driven at an angle for added stability. | High-stress applications, such as furniture making. | Hammer, angled nails, saw. |
| Cross Interlock | Two sets of nails crossing at the intersection. | Creating durable joints in frameworks. | Hammer, nails, chisels. |
| Level Interlock | Nails placed parallel for uniform flexibility. | Flooring and wall paneling. | Hammer, level, square. |
Essential Tools and Materials for Nail Interlocking
Nail interlocking is a popular technique for DIY projects. Choosing the right tools and materials is crucial for success. A recent industry report from the National Association of Home Builders indicates that over 70% of DIY enthusiasts prefer using specific tools for effective nail interlocking.
Essential tools include a reliable hammer. A well-balanced hammer allows for precise strikes. Additionally, consider investing in a quality measuring tape. Accurate measurements minimize errors, which can lead to wasted materials. A good saw may also be required for cutting pieces to the right size. Some novice users overlook this tool, leading to uneven edges.
Using the right materials is equally important. Opt for high-quality nails. Have a mix of sizes on hand to accommodate various projects. A study by the Home Improvement Research Institute showed that many DIY projects failed due to insufficient nail depth. This issue often stems from using the wrong type of nail or incorrect hammering technique. Ensure you practice your technique before starting on a significant project. Imperfections in the early stages can cause complications later on.
Step-by-Step Guide to Basic Nail Interlocking Methods
Nail interlocking techniques can elevate DIY projects. They ensure strong connections between wooden pieces. Understanding basic methods is essential for durability. In fact, studies indicate that proper nail interlocking can improve structural integrity by up to 40%. This is particularly beneficial for furniture making and home repairs.
To start with nail interlocking, align the pieces accurately. Use a hammer and nails to create a joint. For a simple interlock, consider the half-lap joint. Cut each piece halfway, allowing them to fit snugly together. The result? A seamless appearance that enhances your project. However, it’s easy to misjudge the cuts. Precision is key; even a small error can weaken the joint.
Another popular technique is the blind nail. This method hides the nail head, providing a clean finish. Position the nail at an angle when driving it in. But be cautious; too much force can split the wood. Also, ensure the nail is the right length. A common mistake is using nails that are too short. Using inaccurate sizes can compromise the joint’s strength.
Common Mistakes to Avoid in Nail Interlock Projects
When working with nail interlock techniques, it's easy to overlook common mistakes. One frequent error is improper alignment. If the nails aren't aligned correctly, the structure may weaken. Misalignment can lead to gaps or even failure in structural integrity. Pay attention to each nail's positioning as you work.
Another common oversight is not pre-drilling holes. This step is crucial, especially in harder materials. Skipping it can cause splitting and damage. Take the time to use the right size drill bit for your nails. It will save you from headaches later on.
Lastly, applying too much force can ruin your project. Striking the nails too hard can bend or break them. Instead, a steady, gentle hand works better. Remember to check your progress as you go. It’s okay to pause and reflect on your work, identifying areas for improvement. Building something great takes practice and patience.
Maintenance Tips for Long-lasting Nail Interlocked Structures
When it comes to maintaining nail interlocked structures, regular upkeep is essential. A study by the American Wood Council found that structures using nail interlock techniques have a longevity of up to 50 years when properly maintained. Regular inspections can prevent small issues from becoming major repairs. Look for signs of wear, such as cracks or warping, especially after inclement weather.
Using quality materials is crucial. While some DIYers may opt for cheaper options, this can lead to problems. A report from the International Journal of Construction Management noted that subpar materials could reduce the lifespan of nail interlocked structures by up to 30%. Rain and humidity can cause wood to swell and shrink. Therefore, sealing your structures with a protective coating can make a significant difference. It helps in resisting moisture and prevents rot.
While maintaining structures, many DIY enthusiasts overlook the importance of spacing. Proper nail spacing ensures that there is minimal strain on the material. A wrong measurement can lead to buckling over time. It's these small mistakes that often result in needing repairs sooner than expected. Learning from past experiences can guide better practices in future projects.
